
We all know that Google Sheets is a web-based application that enables users to create, update and modify spreadsheets and share the data online in real time.
In this blog I will teach you how to submit a simple HTML Form Input data to Google Sheet using only HTML and Javascript, this will help you to carry our surveys or capture leads. This is updated for Google Script Editor 2022 Version.
This example shows how to set up a mailing list form that sends data to Google Sheets but you can use it for any sort of data like I said.
Step 1: Set Up A Google Sheet
Go to Google Sheets and create a new sheet. This is where we will store the form data.
Set the following headers in the first row:
| A | B | C | ... |
|---|---|---|---|---|
1 | Date | Name | |
Step 2: Create a Google App Script

Click on Extensions -> Apps Script. This will open new Google Script. Rename it to something like "Mailing List".

Replace the myFunction() { ... section with the following code snippet:
const sheetName = 'Sheet1'
const scriptProp = PropertiesService.getScriptProperties()

function initialSetup () {
    const activeSpreadsheet = SpreadsheetApp.getActiveSpreadsheet()
    scriptProp.setProperty('key', activeSpreadsheet.getId())
 }

 function doPost (e) {
     const lock = LockService.getScriptLock()
     lock.tryLock(10000)

     try {
         const doc = SpreadsheetApp.openById(scriptProp.getProperty('key'))
         const sheet = doc.getSheetByName(sheetName)

         const headers = sheet.getRange(1, 1, 1, sheet.getLastColumn()).getValues()[0]
         const nextRow = sheet.getLastRow() + 1

         const newRow = headers.map(function(header) {
             return header === 'Date' ? new Date() : e.parameter[header]
         })

         sheet.getRange(nextRow, 1, 1, newRow.length).setValues([newRow])

         return ContentService
         .createTextOutput(JSON.stringify({ 'result': 'success', 'row': nextRow }))
         .setMimeType(ContentService.MimeType.JSON)
        }

        catch (e) {
            return ContentService
                .createTextOutput(JSON.stringify({ 'result': 'error', 'error': e }))
                .setMimeType(ContentService.MimeType.JSON)
        }

        finally {
        lock.releaseLock()
        }
}
Save the project before moving on to the next step.
Step 3: Run The InitialSetup Function

You should see a modal asking for permissions. Click Review permissions and continue to the next screen.
Because this script has not been reviewed by Google, it will generate a warning before you can continue. You must click the "Go to Mailing List (Unsafe)" for the script to have the correct permissions to update your form.

After giving the script the correct permissions, you should see the following output in the script editor console:

Now your script has the correct permissions to continue to the next step.
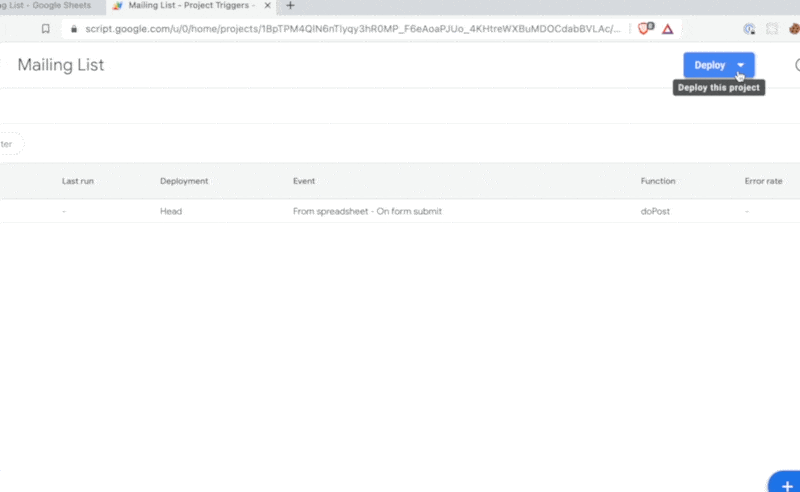
Step 4: Add A Trigger For The Script

Select the project "Triggers" from the sidebar and then click the Add Trigger button.
In the window that appears, select the following options:
Choose which function to run: doPost
Choose which deployment should run: Head
Select event source: From spreadsheet
Select event type: On form submit

Then select "Save".
Step 5: Publish The Project
Now your project is ready to publish. Select the Deploy button and New Deployment from the drop-down.
Click the "Select type" icon and select Web app.
In the form that appears, select the following options:
Description: Mailing List Form (This can be anything that you want. Just make it descriptive.)
Web app → Execute As: Me
Web app → Who has access: Anyone
Then click Deploy
Important: Copy and save the web app URL before moving on to the next step.

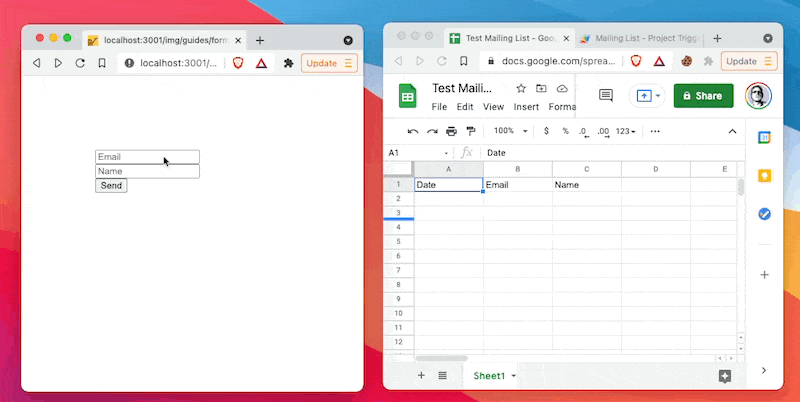
Step 6: Configure Your HTML Form
Create a HTML form like the following, replacing YOUR_WEBAPP_URL with the URL you saved from the previous step.
<formmethod="POST"
  action="YOUR_WEBAPP_URL"
><input name="Email" type="email" placeholder="Email" required><input name="Name" type="text" placeholder="Name" required><button type="submit">Send</button></form>
Now when you submit this form from any location, the data will be saved in the Google Sheet.
The Best Part:
You can send the same HTML form via email and collect responses directly from the email. This does not require AMP email, check the video below on how its done. Unfortunately this can be done only on gmail id which are 85% of segment list.